Thursday, December 17, 2020

Tips to Help you Hack Your Finances

It can be super hard starting out in this world as a young adult, or having to start over later in life. I want to share a couple tips with you that have helped me, though. 

Credit Cards

First of all: credit cards. They can be great for you or terrible depending on how you use them. What you shouldn't do is treat credit cards like you have extra cash to spend on things you don't truly need. What is good is to get a credit card and use it to get only the things you normally would anyway, like gas and groceries. If you know how to live below your means, you can get a lot of benefit out of having a credit card. 

The first step of using a credit card to help you get ahead is to pay what's on the credit card off each month. If you do that, you will never pay interest. I recommend setting it up on autopay for the full amount so you don't accidentally forget and have to pay interest. (Extra tip: make sure when you apply for a credit card that you get one with no annual fee so that having a credit card truly doesn't cost you anything extra). Having a credit card will allow you to build your credit score, allowing you to have lower interest rates when you take out loans for things like cars or a house in the future. 

In addition to this, you can get credit cards that give you cash back or other kinds of rewards. So, not only do you never pay interest and build your credit score, you are also being paid to purchase what you would have to anyway. I started out with a Discover It credit card. It gave me a couple percent cash back on purchases. Over time I've been able to get cards that give higher percents cash back. 

Stocks

Next: the stock market. This one can seem really hard to get into, but it is more accessible and easier to get started than you might think. Before you invest in the stock market, you should set aside some savings. Also keep in mind that stocks are a long term investment, so whatever you put in needs to stay there at least a few years. 

After you have some savings set aside and some more that you want to invest, now it's time to talk about how to start investing. My first advice is to go with something like a mutual fund where each stock buys you into multiple different companies. It's safer to invest in multiple different companies than to put all your eggs in one basket. I have mutual fund stocks that are for places like Amazon and Apple. I also have exchanged traded fund stocks, although I don't like them as much since their rate of return has not been as high. Since 2016, these stocks together have almost tripled in value, so I know they can give a good rate of return while being fairly low risk. 

My next advice about stocks is to wait until the market is down to buy. You don't want to buy stocks when the market is up, or you will get less bang for your buck. For example, I bought my stocks in January of 2016 when the market was down, which is one thing that has allowed me to have a very good rate of return. December of 2018 and March of 2020 are other times that the market has been down and it was a great time to buy. If you are going to use an investing company like Edward Jones, you can let them know that you want to invest but prefer to wait to buy until the market is down. Your financial advisor can help you determine when it is a good time to buy. 

Speaking of investing companies and financial advisors... When you have an account with a place like Edward Jones, you get a financial advisor to handle your money and give you advice for no extra cost. The only cost involved is that they get a small fee from your earnings. I think that's worth being able to have someone do the work for you and give you invaluable advice. 


Monday, August 10, 2020

Life Hack to Help You Feel Better on Less Sleep

 This school year is going to be one for the books. I'm going to be teaching full time and attending my last year of grad school. While in college, I've grown accustomed to being too busy and getting too little sleep, but this year will be a challenge even for me. I need to be strategic and pull out a life hack that has helped me before. 

Has your alarm ever gone off when you were in the middle of deep sleep? Mine has. It leaves me with brain fog and can affect my whole day. There is a way to make sure that never happens! You can get a free app for your phone called Sleep Cycle. Sleep Cycle is a smart alarm. You set a time frame in which you want to wake up (mine was set for 6:10-6:40 this morning). Sleep Cycle monitors frequencies you emit to be able to tell when you are in deep sleep and light sleep. When you are in light sleep during that alarm time frame, the alarm wakes you up. 

I found Sleep Cycle years ago and have never ceased to be impressed with it. It gives me a better start to my day. I have less brain fog and am less grumpy when I use Sleep Cycle as my alarm. 

Anyways, I have no affiliation with Sleep Cycle and just wanted to share this life hack with you. I encourage you to try it if you have difficulties waking up in the mornings. 

It's pretty interesting to see your sleep data that Sleep Cycle tracks for you! Here is my data from last night's sleep. 


Monday, July 27, 2020

Quick & Easy Avocado Quinoa for One

I have wanted to like quinoa, but never found it very tasty... until now! This meal for one is quick, tasty, and healthy! 

Servings: 1
Prep time: 15 minutes

Ingredients: 
1/4 cup quinoa
1/2 cup vegetable broth
Pepper to taste
1 clove of garlic or 1/2 tsp. minced garlic 
1/2 an avocado
Lime juice, enough to drizzle over avocado

Instructions: 
  1. Rinse quinoa with water until water runs clear. Drain well.
  2. Heat quinoa, broth, and pepper to taste in a small sauce pan to boiling. Reduce to simmer and allow to cook until liquid has evaporated (about 10 minutes). 
  3.  Stir in garlic, then remove quinoa from heat and leave covered a few minutes while preparing avocado. 
  4. Cut avocado in half lengthwise (if not done previously) to get 1/2 an avocado. (Tip: leave the pit in the half being saved for later to prevent it from browning.) Remove peel and cut avocado into pieces. Drizzle lightly with lime juice. 
  5. Plate the quinoa and add the avocado to it. Mix as desired. Enjoy!  
Note: If you want a different amount of quinoa, this recipe can be easily adjusted. Just use one part quinoa and two parts broth. 

Friday, June 26, 2020

Guide to a Eureka Springs Vacation with a Dog

We just got back from vacationing in Eureka Springs, AR. We spent three days and two nights there with our dog. Although you can’t do everything with a dog, there’s still plenty to do! I am making this to help anyone who might want to visit Eureka Springs with a dog. This is also a good resource for anyone who likes to enjoy the outdoors! 

Where to Stay
There are dog-friendly hotels, but we opted to camp since it is cheaper and offers outdoor activities. The place I recommend for this is the Dam Site Lake Campground along the Beaver Lake. Dogs are allowed everywhere except the designated swimming area and the shower houses, and there is no pet fee. Our campsite was right on the water, so we could just walk down from our site to swim with our dog. There are also hiking trails along Beaver Lake. 

What to Do: Seeing the City
When we got there on the first day, we wanted to see the city. Be aware that if you want to explore downtown, you will need to pay $5 to park. It is handy to keep $5 bills on you for that purpose. There is one free parking area but you will have to walk pretty far if you want to visit the downtown stores from there. 

Quite a few of the stores in downtown Eureka Springs allow dogs. Natural Treasures and Packrats Paradise are a couple I remember that allow dogs. We wanted to check out Blackie's Backyard, but it was not open when we were there. Do not be afraid to peek in and ask the store managers if dogs are allowed or not! Some store managers also leave out water bowls for them. 

Besides stores, Basin Spring Park is nearby and allows dogs.

Besides downtown, there is the Bark Park. We went there twice and did not see other dogs there, so that was kind of a bummer. It is a good place to let your dog get some energy out after being in the vehicle a while, though. 

Christ of the Ozarks also allows dogs. Don’t miss seeing the piece of the Berlin Wall if you go!

What to Do: Outdoor Adventures 
The second day we were there, we went floating. If you have a smaller dog, you can probably get away with kayaking. With a German Shepherd, we always opt for renting a canoe. We did a float trip on the King’s River, but there are lots of places nearby to float and swim. I want to look into floating on Beaver Lake next time. 

The third day we were there, we went to War Eagle Cavern. As far as I know, War Eagle Cavern is the only cavern that allows dogs. They are allowed everywhere except the gift shop. There is a doggie hitching post outside the gift shop if your dog doesn’t mind being left for a few minutes. The cove of Beaver Lake and the cavern are pretty cool! The gift shop was also one of my favorite shops we visited! (One of us watches the dog while the other goes inside when there is a place we want to go into that does not allow dogs.)

Lake Leatherwood offers outdoor activities and is dog friendly. I was not impressed with it, though. There was a lot of trash around the lake. I preferred Beaver Lake where we were camped. 

There are lots of hiking options in and near Eureka Springs. We did not end up hiking because it was hot and had not rained recently when we were there. We may have visited Tea Pot Falls or Eagles Nest Falls if it had rained. 

See at least one sunrise or sunset! This is a picture of a Beaver Lake sunrise:
If you like fishing, there are lots of great fishing spots in or near Eureka Springs! Options include Beaver Lake, the White River, and the Kings River, among others. 

Where to Eat
I saved the best for last! Eureka Springs is unique in that you can experience fine dining with your dog! Several restaurants have outdoor seating areas where dogs are allowed and you can be served. The food was one of my favorite parts of the trip! The four restaurants below are ones that had outdoor seating where dogs are allowed that we ate at. 

Amigos
Amigos is in downtown Eureka Springs, so you will need to park nearby for $5 if you want to eat there. Everything from the food to the service was fantastic! They have delicious carne asada, margaritas, and flan, among other things. Amigos is a do not miss! 

Horseshoe Grill
Horseshoe Grill is not downtown and has its own parking area, so not having to pay for parking is a plus! The food and service were good! They have some great side options, like Mac n cheese and baby bakers. 

Sparky’s 
Sparky’s is also not downtown and has its own parking area, so you don’t have to pay for parking. We got burgers and they were some of the best burgers we’ve ever had! Sparky’s menu is huge! The outdoor seating is a little ratchet, but it was obvious that the employees are very cleanly and have great practices.

New Delhi Cafe
New Delhi Cafe is downtown, so you will need to pay $5 for parking if you go. This was my least favorite, mostly because of the server we had. It’s worth a trip if you are curious about what Indian food is like, otherwise I wouldn’t recommend it. 

Other Restaurants 
Rowdy Beaver does not allow dogs; we asked.

There were some other places that we did not have time to check out: Bad to the Bone BBQ Pit, La Familia Tex Mex, Eureka Grill, and Anglers Restaurant. They had outdoor seating, but I don’t know for sure if they allow dogs since we did not go. There are also food trucks and other places you could get to-go at if you don’t mind not dining in. 

Final Thoughts 
Eureka Springs is worth a trip! We hope to go again, perhaps without our dog so that we have some different options. I hope this is helpful for you if you decide to go with your dog! 


Sunday, May 10, 2020

Our Chicken System


Counting Losses
It has been a sad week for us in our chicken adventure. We lost two of our eight chickens to predators. They were taken in the same day, and all that was left was two piles of feathers. I am almost certain that coyotes did this. One reason I suspect this is that I saw a young coyote in the middle of the day in a nearby field the day before it happened.

The chickens taken were the two that often strayed from the flock to adventure on their own. I know this is natural selection at play, but it is sad to lose any livestock. We have cared for them every day for 6 months now.  

The farm must go on! Coyotes are extremely difficult to get rid of. Trapping is the best way to get rid of them, and I am not prepared to do that. We will therefore no longer free range the chickens for the foreseeable future. 

Adding a Dust Bath House
It is very important this time of year that the chickens be able to dust. Dusting (flapping in loose dirt) is how chickens bathe. I decided that if they can no longer free-range, we needed to provide them with a dust bathing area in their pen. I have seen people do this by putting dirt in tires. We happen to have an old dog house that I thought might be even better. It is enclosed all around except for the entrance, which is perfect for keeping the dirt concentrated.
I burnt a brush pile the other day, so I was able to add some ash to the dirt mix inside the chicken dust bath house. The chickens were cautious around it at first, but some grass clippings inside helped convince them that the chicken dust bath house is a safe place. 
Other Features of Our Chicken System
Our chicken pen is a stall in our barn. I do not remember exactly, but I estimate that it is about 10ft x 12ft. Obviously more space would be better, but the hens are content with this much space.

The picture below shows the set-up we have for the waterer, feeder, and roost. I really like the roost that my husband Luis made. I can pick it up and move it, making it very easy to clean out the area underneath. The waterer is on landscaping blocks to help keep the water clean.

The feeder is a store bought feeder with a PVC pipe extension. We have it suspended between the walls with rope so that the chickens cannot knock it over. Unlike feeders I have tried in the past, this one has very little waste. We use kitty litter boxes for the nesting boxes, and we have hay in them for the nests. We tried pine shavings, but the chickens would just scratch the shavings out.
I have been around chickens my whole life and had my own since I was about 12. Although we do not have a perfect chicken system now, what we have is pretty good! Let me know if you have any questions about keeping chickens!

Monday, May 4, 2020

Finding the Perfect Sage Green


Ever since we bought our house about a year and a half ago, I have envisioned painting the bedroom I use for my office sage green. The entire house needed repainted badly. The tans on the walls were faded and stained. It has taken me a while to get to the office, because green is a very tricky color! It is very easy to get too much yellow or too much blue in it. Too much yellow, and it looks tacky. Too much blue, and it looks like an Easter egg. 

The safest way to get a sage green that you can love for years is to go with a gray-toned sage! We went with Gray Expose 5007-2A by Valspar in eggshell. 
Gray Expose
Other colors we considered are Tornado Watch 6002-2A by Valspar and Rare Gray SW 6199 by Sherwin Williams.
Valspar Paint - Color Chip - Tornado Watch
Rare Gray SW 6199 - Green Paint Color - Sherwin-Williams

Gray Expose was the right choice for us. I really love this color! It is green, but not too green. It is both soothing and elegant. 

It is hard to capture a picture that does this color justice, but here is one that I think shows the true nature of Gray Expose: 

Monday, April 27, 2020

Hubby's Fried Deer Steak Fingers


Fried deer steak fingers is one of my favorite meals that Luis makes! He makes the deer and I make mashed cauliflower and gravy to go with it. Luis eye-balls all of his spices, but I asked him to try to estimate what he uses so I can share this delicious recipe with y'all. For it to be authentic, don't be afraid to eyeball the spices and make this your own. Do note, he was being a little funny when he came up with some of these instructions. ;-)

Ingredients:
  • Strips of deer cubed steak
  • 1 cup flour
  • 2 tbsp. creole
  • 1 tbsp. black pepper
  • 3 shakes of sea salt
  • 2 shakes of garlic salt
  • 6 shakes of garlic powder
  • 3 non-gmo cage free eggs
  • 2 splashes of milk
  • Oil for skillet
Directions:
  1. Mix flour and spices in one container.
  2. Whisk eggs and milk to combine in another container. 
  3. Take deer steak fingers dip into flour, then dip into the egg wash, then back into the flour, then back into egg wash, and then back into flour  (repeat as much as you like or until you run out of egg wash or flour).
  4. Add oil to skillet, set stove to little more than medium, and let oil heat up.
  5. Set deer steak fingers in skillet for about around 3-5 mins or until blood flows up from within the steak fingers, then flip and cook for about another 3-5 mins.
  6. Serve and enjoy!

Sunday, April 19, 2020

Bedroom Before and After

This week isn't a recipe, although I have more of those coming. 

We have made big changes in our bedroom this month! First, we got a new bedset. I searched and searched for a bedset that 1.) fit my style 2.) we could afford and 3.) is made of real wood. This bedset meets all of my criteria! We also got it at a local business that delivered it and put it together for us. Here is a close up to show some of the details: 
The boards feature live edges. It is the Ivan Smith Pasco bedset in case you want to check it out. 

I also did a major paint overhaul in the bedroom. The walls were a faded and stained beige color. I made an accent wall with Rainy Afternoon by Benjamin Moore and painted the other three walls Silver Song by Benjamin Moore. Here is a before and after comparison: 
Farmhouse style with its very beige and greige tones has been in for a while, but I want to challenge you to be bold with color! The dark green color I chose is not everyone's cup of tea, but it is mine. I have a style that I like to think of as "naturesque", or something. Use color in a way that is uniquely your style! (Unless you plan to sell soon, then use colors everyone likes.) 

Next, I plan to share some of the accessories in the room! I have some more accessories on the way right now, so it will have to wait.


Saturday, April 11, 2020

3 Ingredient Berry Blast Syrup

I never find pancakes entirely satisfying without there being fruit involved. I came up with this easy recipe so that I can whip up home-made pancakes with berry blast syrup any time I get a pancake craving. 

This makes enough syrup for 1-2 people. 

Ingredients
  • About 1 cup frozen berries of choice (I usually use mixed berries)
  • 3 tbsp. honey (2 tbsp. sugar should also do the trick)
  • 1 tbsp. lemon juice
Directions
  1. Add all ingredients to a small sauce pan. Bring to boil. Reduce to a simmer; simmer until syrup begins to thicken, stirring occasionally. 
  2. Remove from heat. Serve on pancakes. I recommend topping with whipped cream! 
Notes
I usually cook this simultaneously with the pancakes so they are done about the same time. If you let this sit while you cook the pancakes, the syrup may become too thick. If that happens, just add it back to the heat until it becomes the consistency you like. 

For a twist on this that I call berry lemonade syrup, use more lemon juice to taste (about 2 tbsp.). 

Monday, April 6, 2020

Pandemic Burritos: Easy Breakfast Burritos with Common Ingredients

Easy meals are crucial during busy times, or like now, times when we have not gone to the grocery store in a while because there is a pandemic. Something we are never short of at my house is eggs. Our 8 hens give us more eggs than we could possibly need.

I threw together a couple satisfying meals with eggs and other items that we typically have at home. Keep reading for an easy way to make burritos using mainly eggs, beans, and rotel!
 
Easy Breakfast Burritos

Servings: Makes about 6-8 burritos

Ingredients
  • 12-14 eggs
  • 1 can black beans (rinsed and drained)
  • 1 can rotel with green chilies (drained)
  • 1-2 cups cheese
  • Salt and pepper to taste
  • Oil for skillet 
  • Tortillas
  • Optional: salsa
Instructions
If dividing into two meals (3-4 burritos for each meal): 
  1. Heat a small amount of oil in a skillet on medium heat.
  2. Add 6-7 eggs, half a can of black beans (rinsed and drained), and half a can of rotel (drained) to the skillet. Season with salt and pepper. Stir and cook until eggs are firm. 
  3.  Spoon burrito mix onto burritos, sprinkle with cheese and salsa (if using). Serve and enjoy!
  4. Refrigerate the other half of ingredients for later use. Repeat steps 1-3 when making a later meal. 
If making one meal (all 6-8 burritos at once): 
  1. Heat a small amount of oil in a large skillet on medium heat. 
  2. Add eggs, black beans (rinsed and drained), and rotel (drained) to the skillet. Season with salt and pepper. Stir and cook until eggs are firm. 
  3. Spoon burrito mix onto burritos, sprinkle with cheese and salsa (if using). 
  4. Serve and enjoy!  

Monday, March 23, 2020

Easy and Authentic Mexican Rice

Everyone always raves about my mother-in-law's Mexican rice. Everyone also always wants her recipe for it. The thing is, she doesn't use a recipe. I decided I would pick up what I can from her (mostly by asking my husband a ton of questions about what she does) and create a recipe for Mexican rice. Mexican rice could be made differently of course, but this is really what my mother-in-law uses and does. I also like it because it is simple and easy. I present to you an easy and authentic way to make Mexican rice!  

Easy and Authentic Mexican Rice

Ingredients
  • About 2 tbsp. olive oil
  • 2 cups long grain white rice
  • About 2 tsp. minced garlic (or 4 cloves, minced)
  • 2 caldo de tomate bouillon cubes
  • Salt to taste 
  • Optional: 1 tsp onion powder 
  • 5 cups of water*
Instructions
  1. Rinse rice with water until water runs clear
  2. Heat oil in skillet, add rice. 
  3. Cook and stir occasionally until rice starts to brown. 
  4. Add minced garlic to rice and sautee for about 30 seconds until fragrant. 
  5. Add caldo de tomate, salt, onion powder (if using) and water to skillet. Stir. 
  6. Cover skillet and bring to boil. Then cook (covered) for about 20 minutes, or until water is evaporated and rice is tender. Stir occasionally to disperse the caldo de tomate. 
  7. Serve and enjoy! 
*If all the water evaporates before the rice is cooked through, add more water in order to cook the rice longer.

Additional Tips  
You could add to this recipe by adding small pieces of onion, tomato, and/or jalapeno. You could use some broth instead of all water. You could also use more caldo de tomate cubes if you want to strengthen the flavor. 

For a treat, put chicken and queso blanco on top of a bed of this rice for what some call "chicken on the beach"!
For another treat, make "chicken on the beach" fajita style!

Monday, March 16, 2020

Easy Way to Get Tender & Juicy Chicken: Thin-Sliced Chicken

Growing up, my family used whole chicken tenderloins for entrees. My husband introduced me to using thin-sliced chicken breasts and tenderloins for entrees. I could not believe how simple but delicious thin-sliced chicken is! So long as it isn't overcooked, it always turns out juicy and tender. 

Not only is thin-sliced chicken delicious, it is quick and easy! It can be made in less than thirty minutes. It is also versatile enough to be used in many different ways. If I were to include an ingredients list, it would literally say: chicken breasts or tenderloins, oil, and whatever else you want. 

Keep reading to see how you can start making thin-sliced chicken in five simple steps! 

Step 1: Thaw chicken if needed. Trim fat from the chicken.

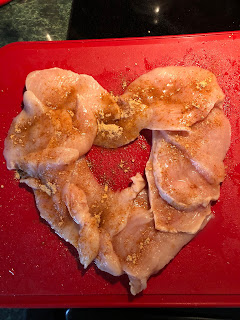
Step 2: Lay the breast or tenderloin down flat. Using a chef's knife or other thick knife, make thin slices through the chicken as shown below. 

Step 3: Season the chicken or put it in a marinade. We have three main ways we like to season thin-sliced chicken depending on what we are eating it with: 
1. Taco seasoning with or without lemon juice
2. Creole seasoning with or without lemon juice
3. Ranch seasoning  


 Step 4: Heat olive oil in a skillet, then add chicken. The chicken will cook in just a few minutes since it is thin, so be careful not to over-cook it!

Step 5: Serve and enjoy! We like to eat creole seasoned thin-sliced chicken with sweet potatoes, taco-seasoned thin-sliced chicken with Mexican rice, and ranch-seasoned thin-sliced chicken with mashed cauliflower.  


For a special treat, we drizzled queso blanco over our taco-seasoned thin-sliced chicken and Mexican rice in the picture above. 

Stay tuned for the Mexican rice recipe I adapted from my mother-in-law! Everyone always raves about her Mexican rice and I was finally able to replicate it and create a recipe for it.

Tuesday, March 10, 2020

Finally the Perfect Sweet Potato

        
 Air Fryer Sweet Potatoes 

I have been searching for the perfect way to make baked sweet potatoes for months! Only once did I get close-to-perfect sweet potatoes by baking them in the oven. My husband just got an air fryer so I thought I would try it out.

To get the perfect air-fried sweet potato:
  • Wash the sweet potatoes
  • Stab the sweet potatoes all over (I use a fork)
  • Rub the sweet potatoes with olive oil
  • Rub salt into the olive oil
  • Put in an air fryer basket and cook at 390 degrees for about 45 minutes - turn about half-way through.
  • Here is the key: When the sweet potatoes are done, the skin will be loose and you can peel it back easily. Do not stop cooking them until the skin is loose or the sweet potatoes will still be hard in the center. 
While still very hot, I cut a slit in the top of the sweet potatoes and add butter. I think a perfectly cooked sweet potato only needs butter, but you can also add brown sugar if you prefer!

 We usually eat sweet potatoes with thin-sliced chicken. I will post that recipe soon! It's simple but irresistible. Stay tuned!